Converting a Deal
Complete guide for converting leads to deals in the CRM system.
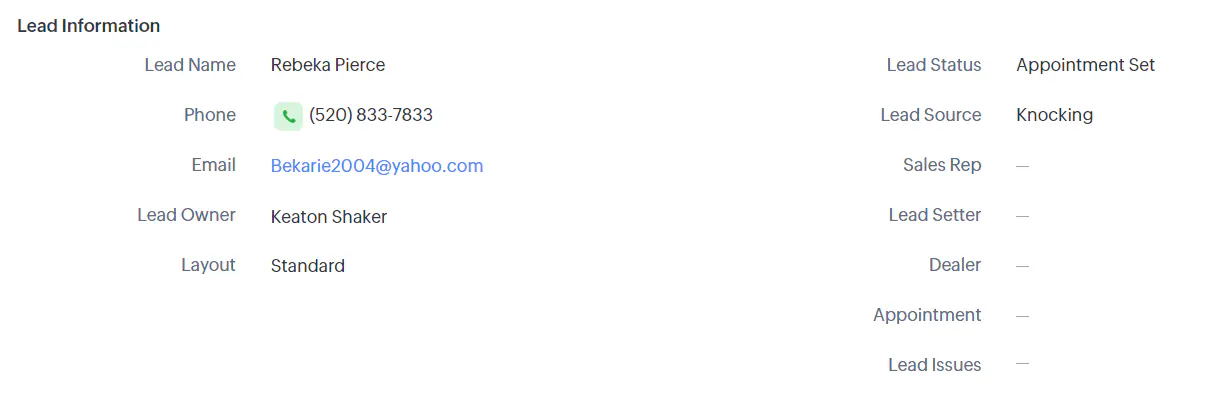
First Look at an Account
As an Account Manager, you own the account from start to finish once the sale has been made! The first time you encounter a new account, will be with the closing docs!
Closing docs will be sent to you via email, at which point you will need to begin the "Deal Conversion" process!
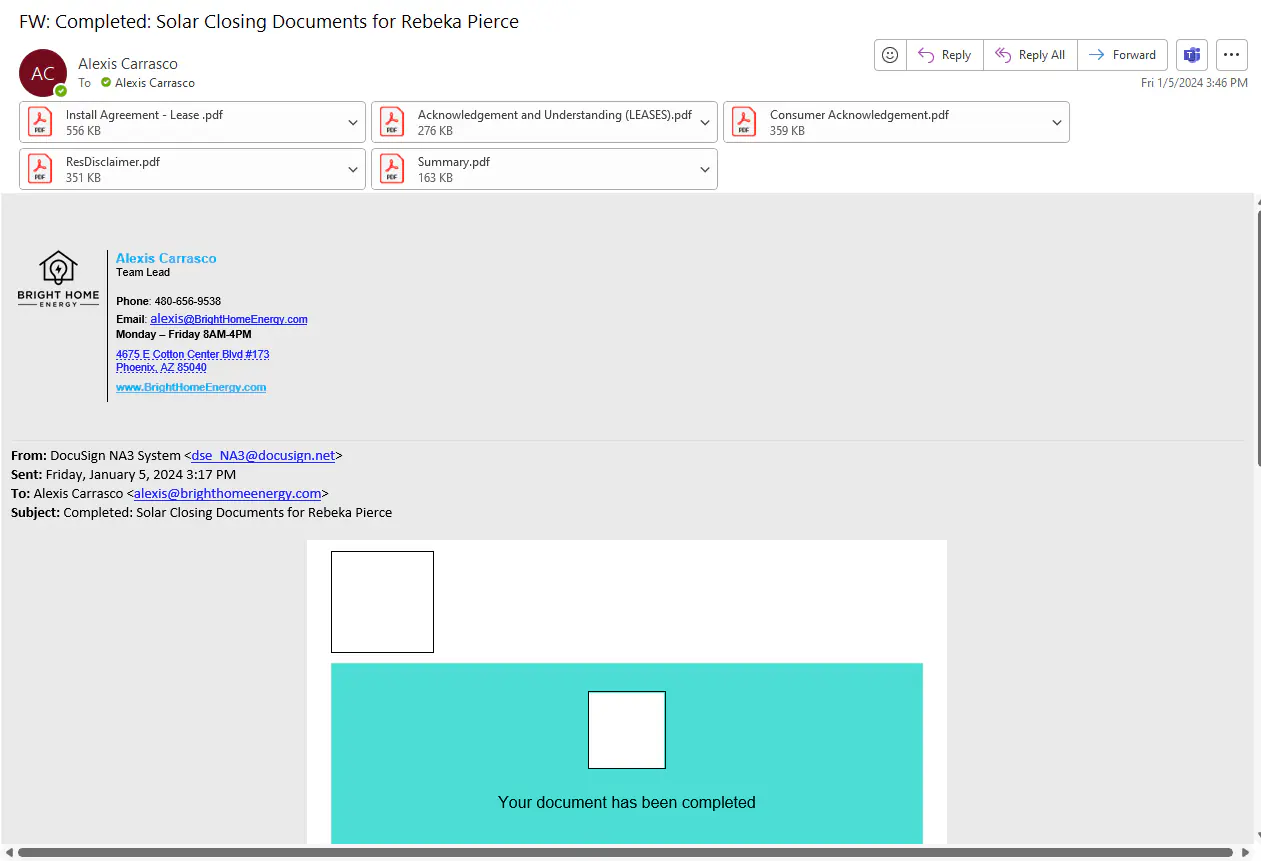
From this email, you will open all attachments
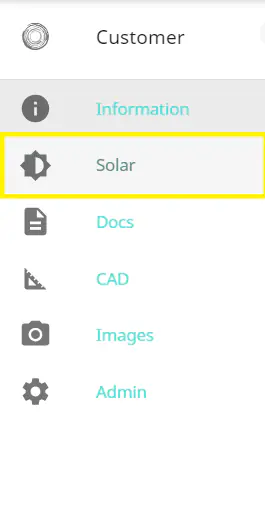
Once all attachments have been opened, you will open ZOHO CRM and SOLO
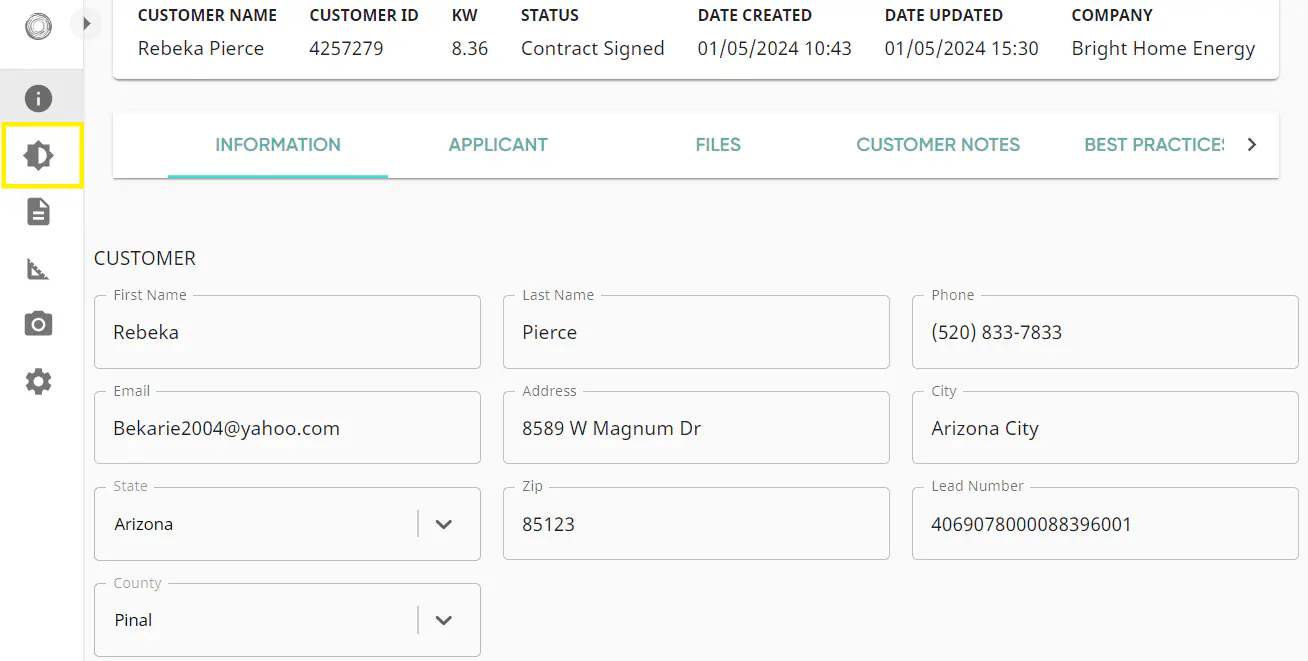
In both of the programs, you will search the name listed on the contract :
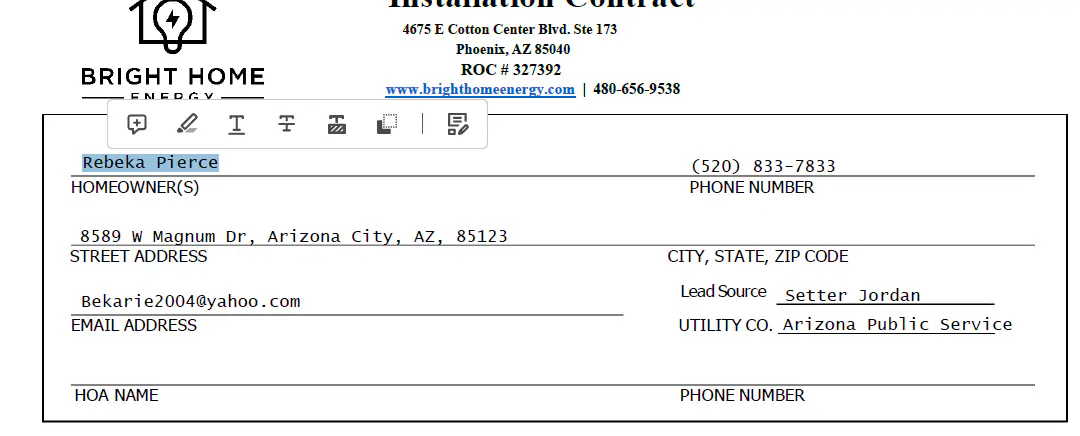
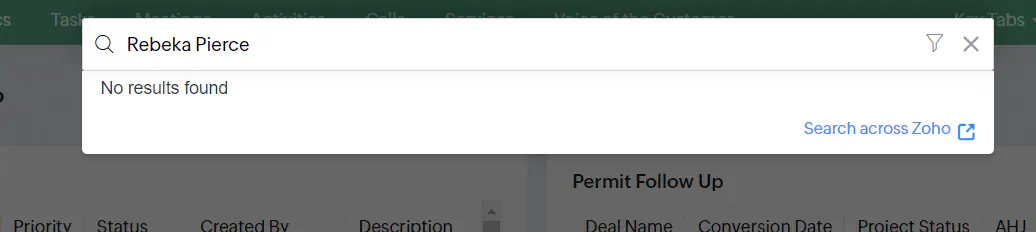

If the name pulls in SOLO, but not in ZOHO, you will then want to try searching the address listed on contract in our CRM
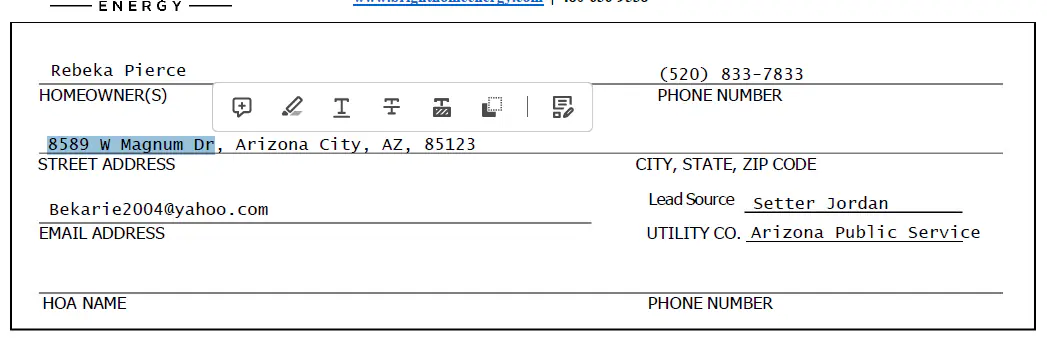
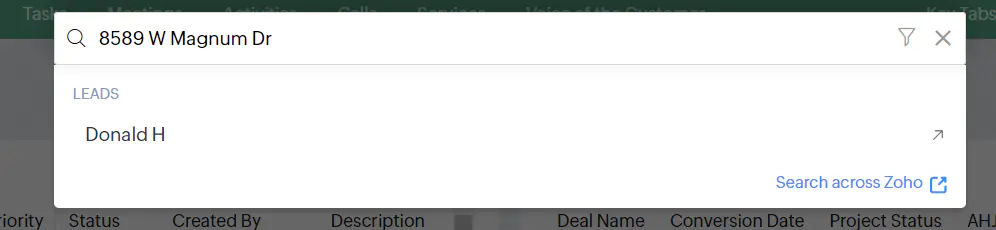
From here, you will open the address associated with the lead, even if it is under a different name!
Now, you have all the tools needed to begin your deal conversion!
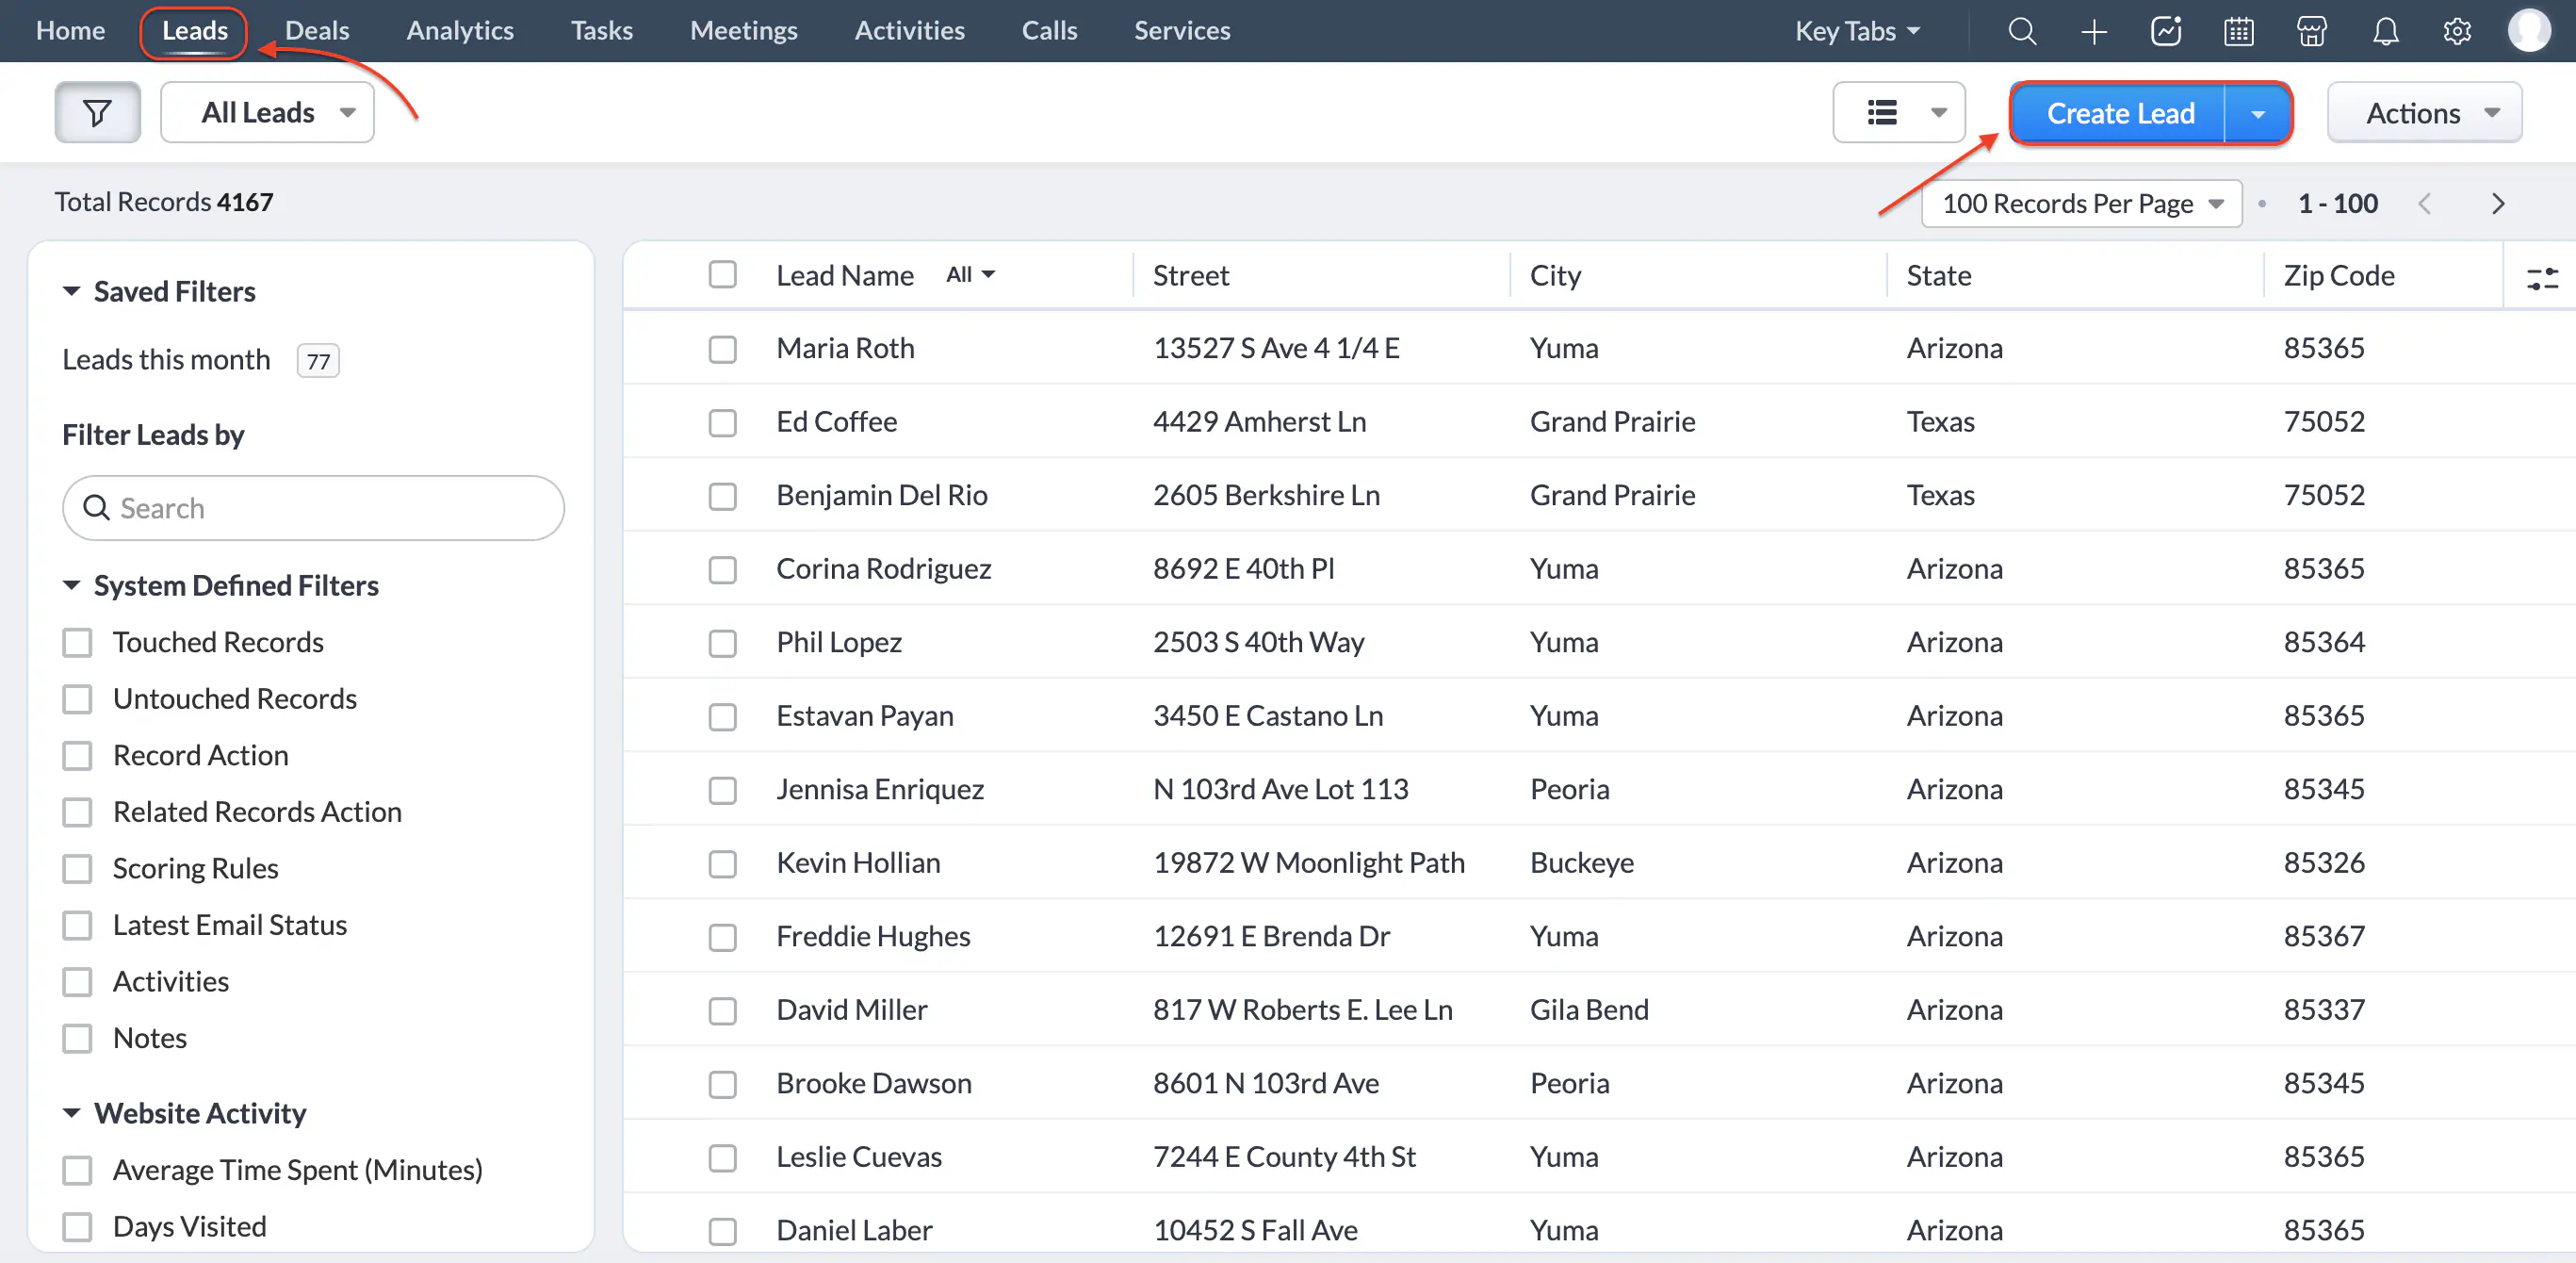
Create Lead (If None Exists)
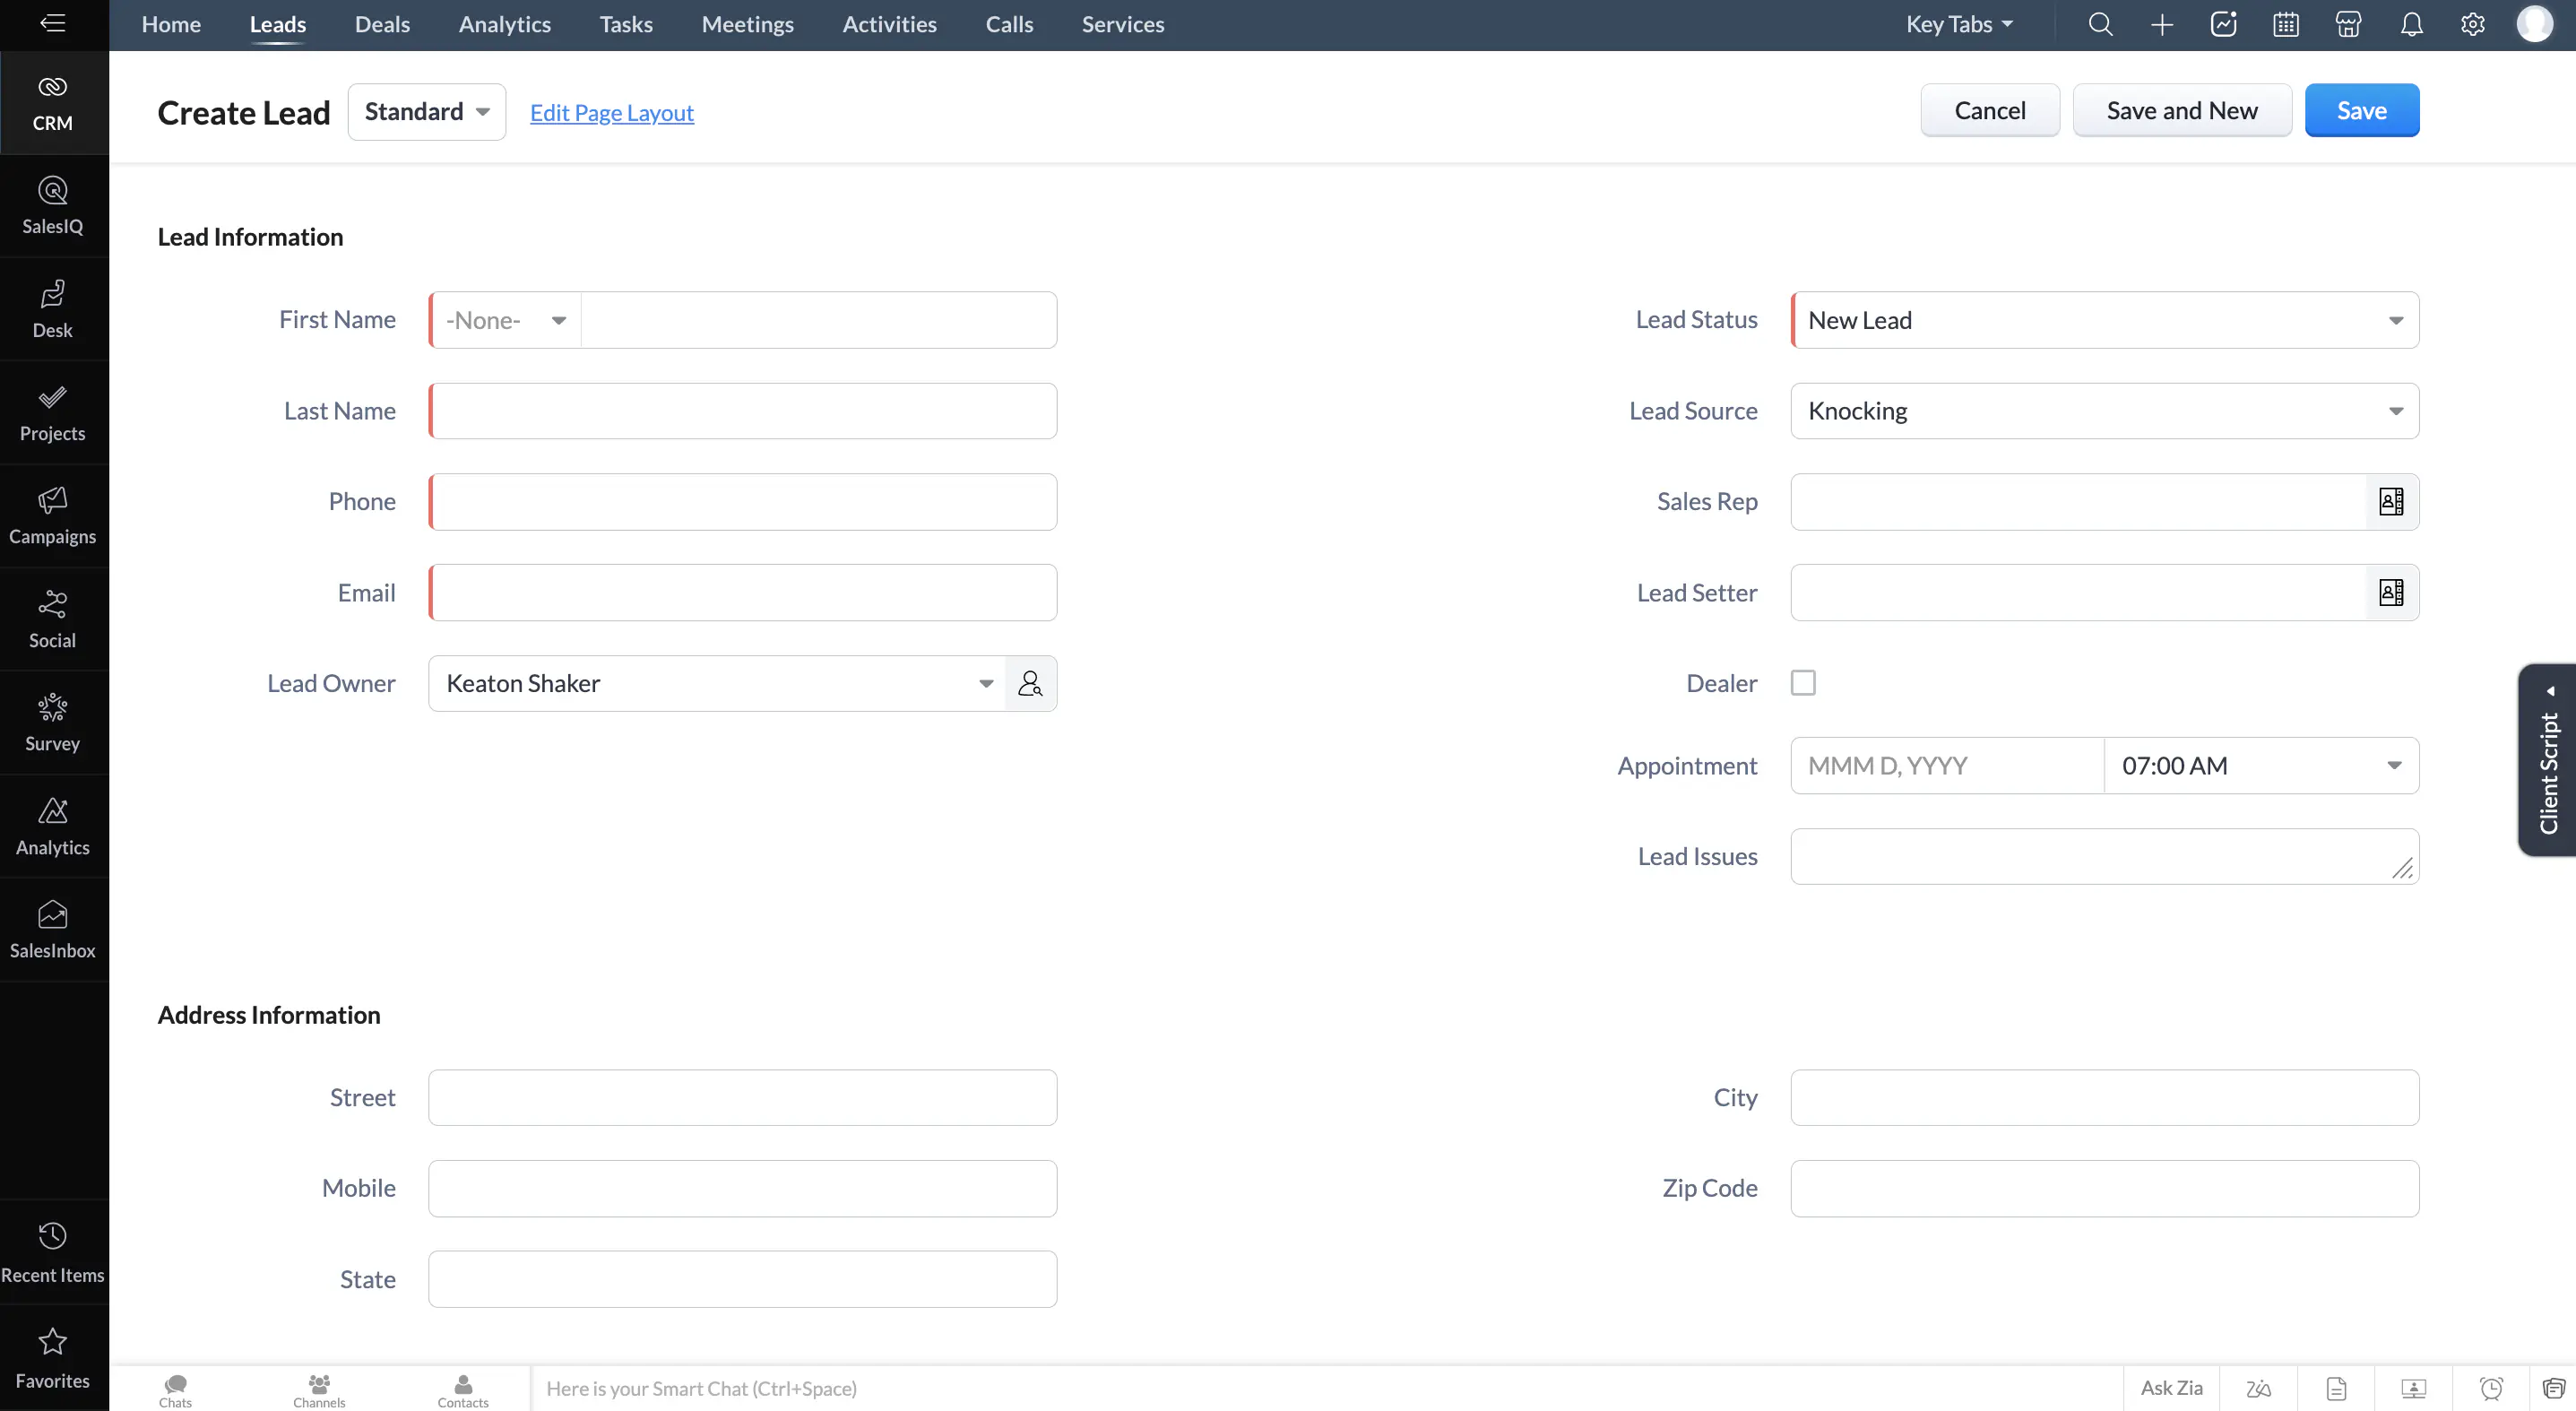
When a lead does not already exist in ZOHO, create one from the Leads page using the Create Lead button and fill in the customer details from the contract and Solo.
This will bring up a blank lead shell that needs to be filled in and saved. We will go over what to fill in next!
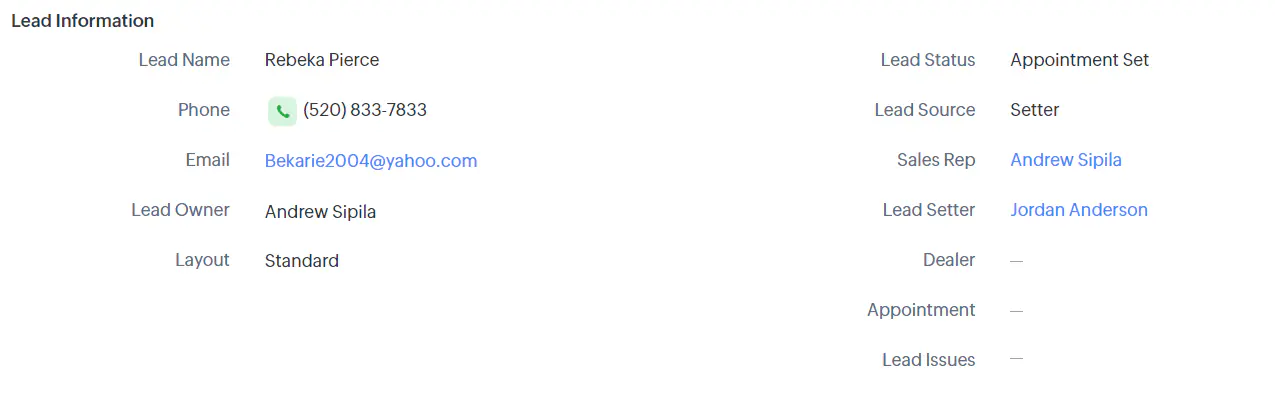
Editing the Lead

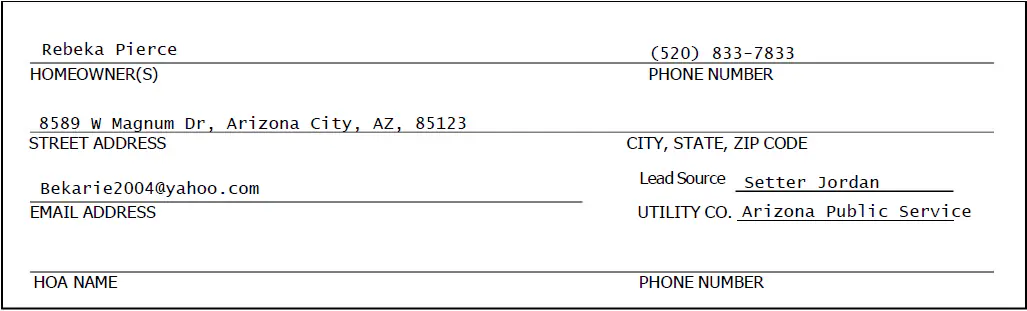
Make sure every field in the lead matches the contract exactly. Use the Edit button, then update name, phone, email, and address.
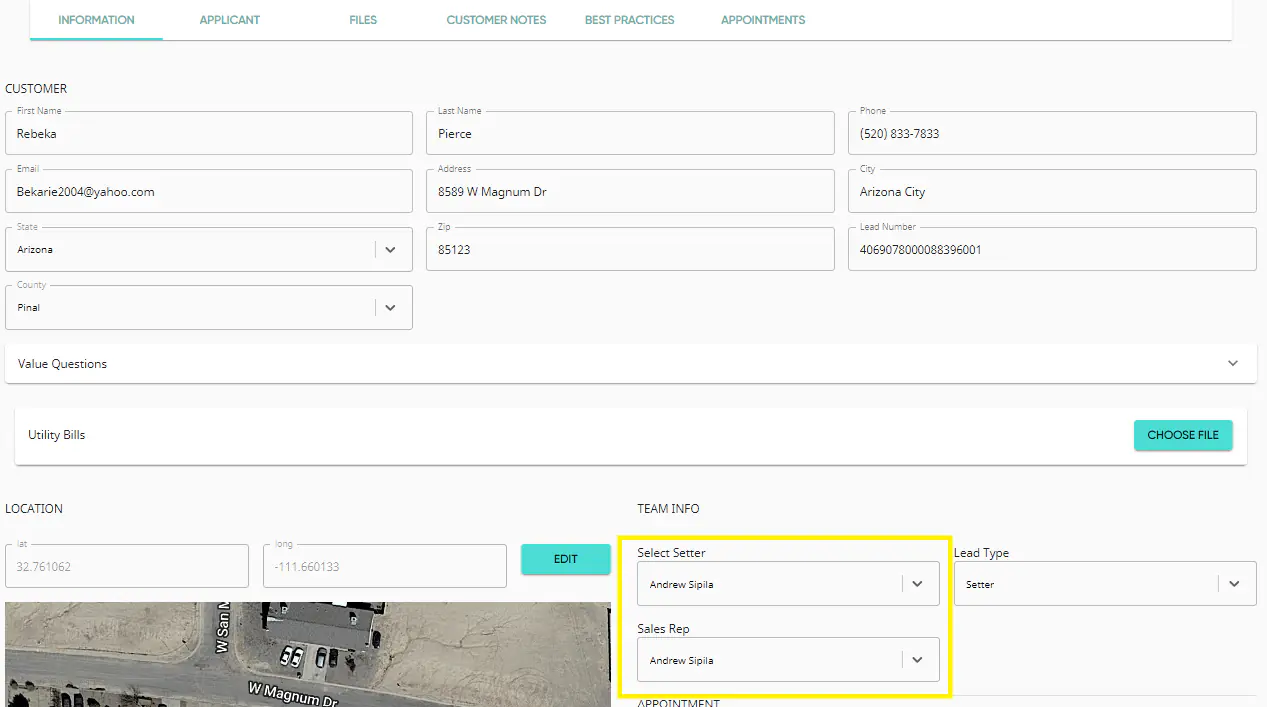
In Solo, set the Sales Rep and Setter. If the Sales Rep is a Dealer, add "(D)" after the customer's last name.
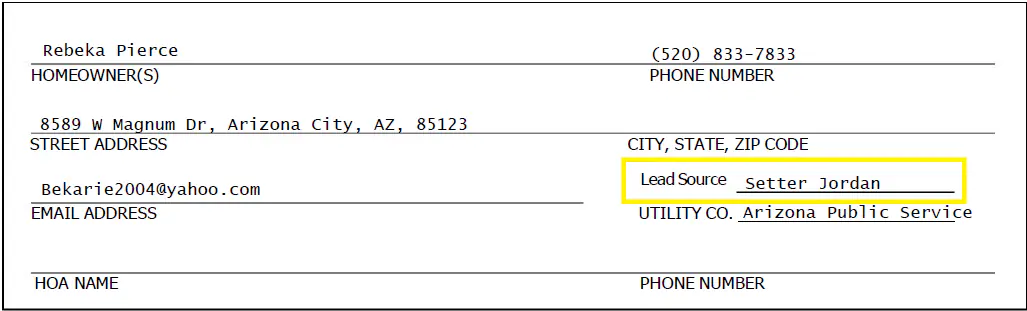
Verify the Lead Source/Setter on the contract and mirror it in the CRM.
Lead Source Cheat Sheet
Ways the Lead Source May Appear on Contract
What to Input in CRM
| Self Gen, SG | Self Gen |
| Knocking | Self Gen |
| Setter | Setter |
| (NAME) | Setter |
| Partner | Michael (Setter Name will Be Michael Shepp) |
| Partner Lead | Michael (Setter Name will be Sales Rep) |
| Online | Online Lead |
| BHE Communities | BHE Communities (Setter will be Tyler Carlisle) |
**Please Note, In the lead itself, not all of the names are available, be sure to update when converting**
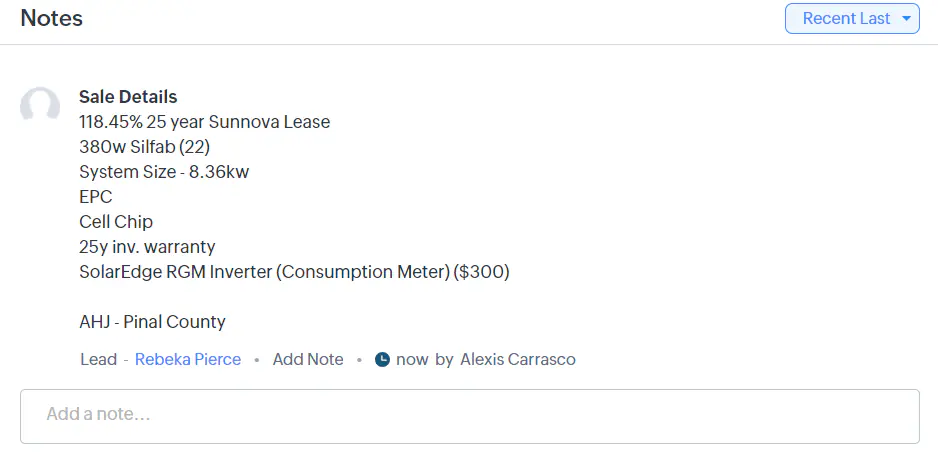
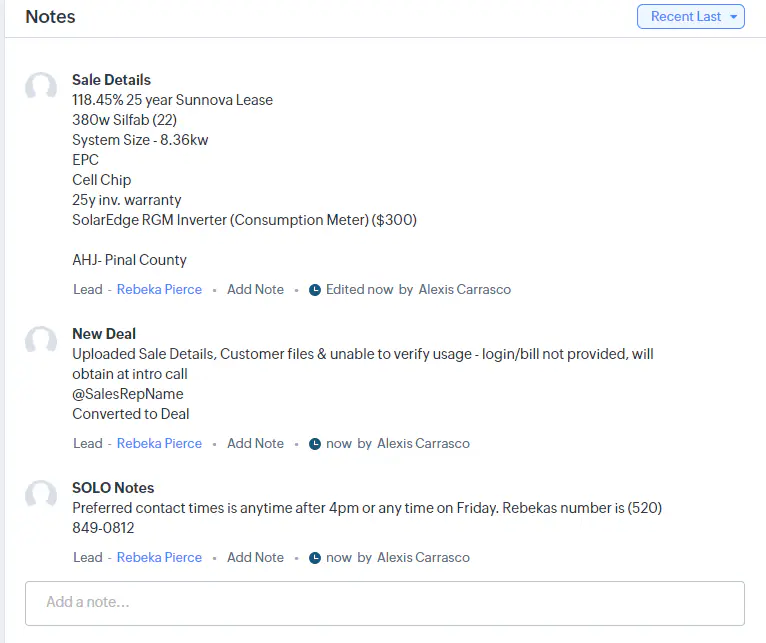
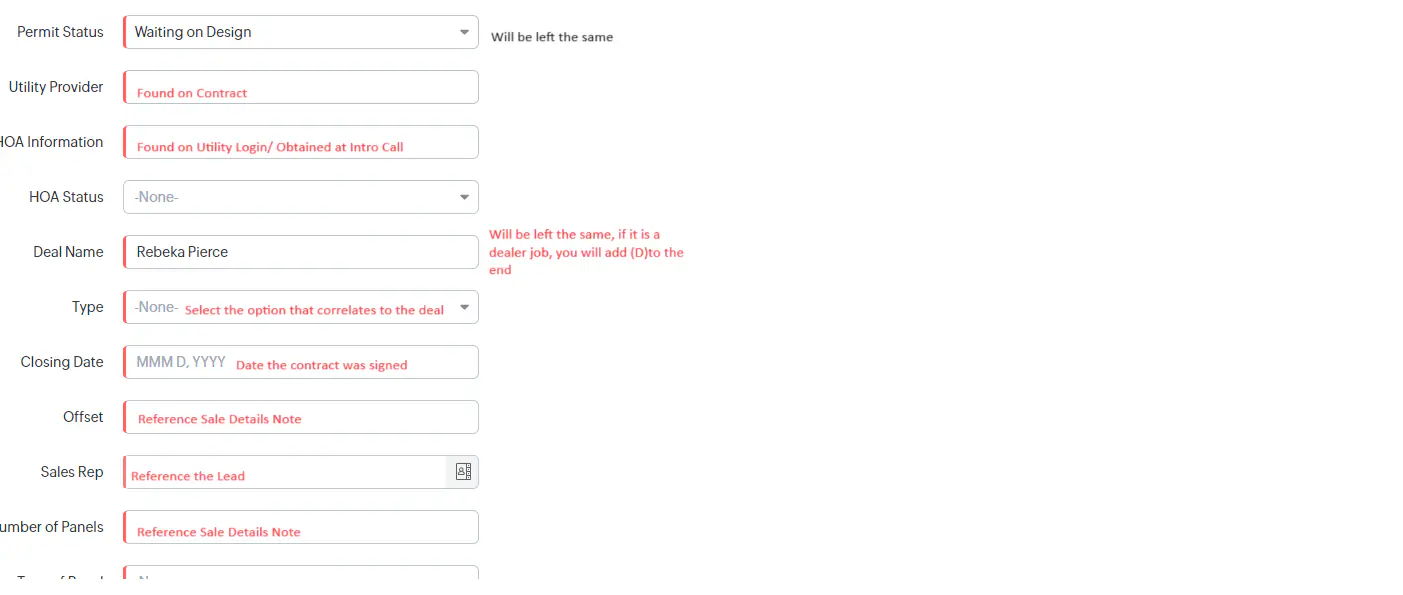
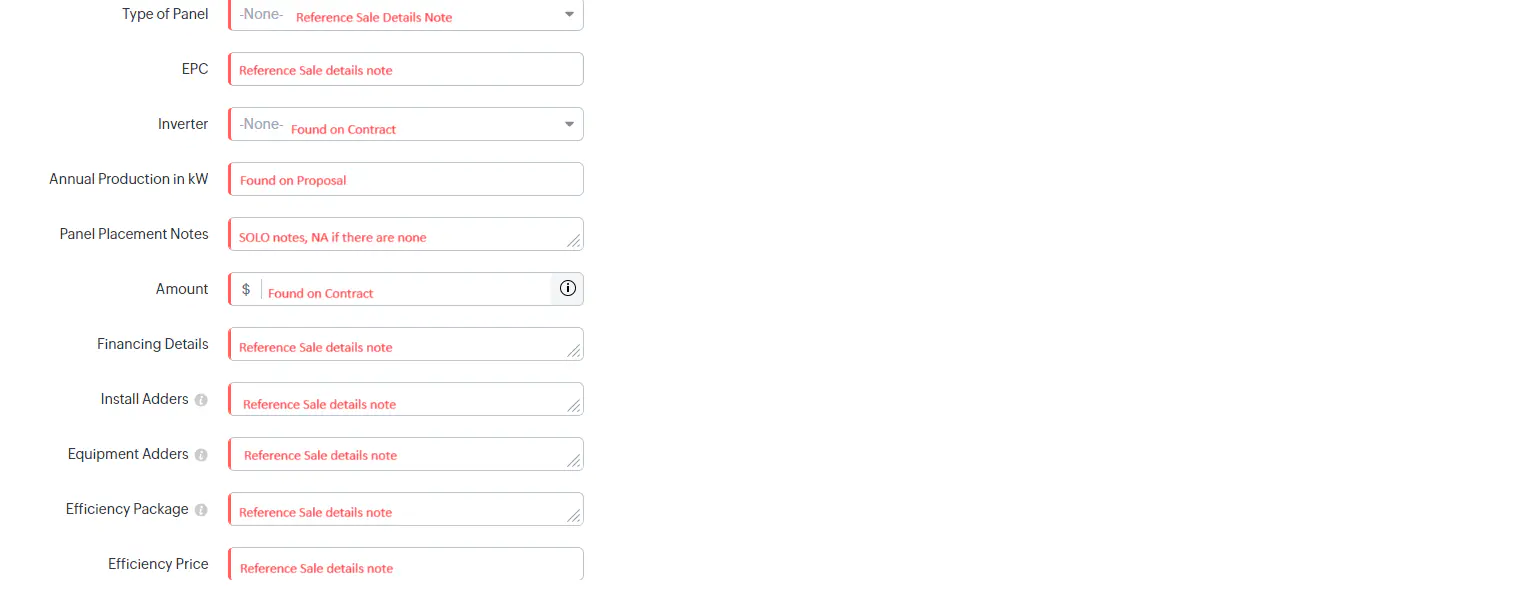
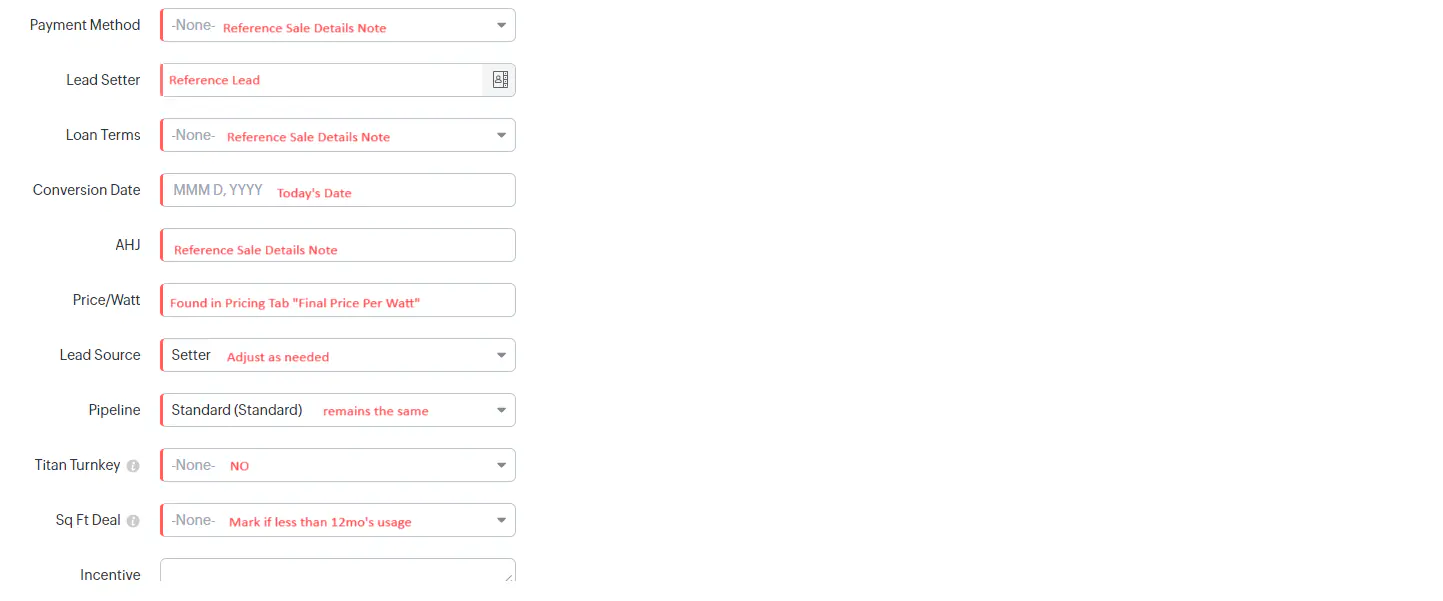
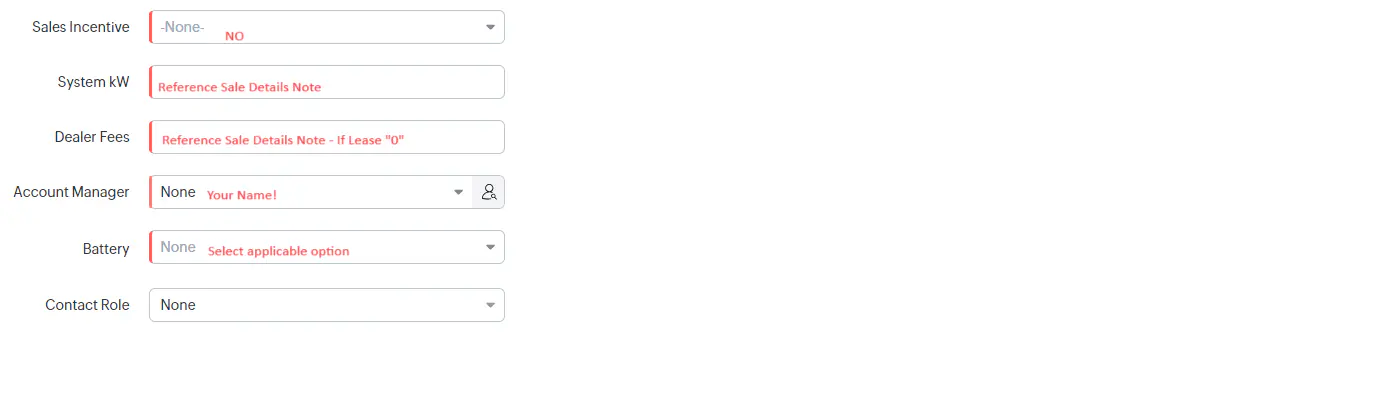
Sale Details
All of the important details of the sale will be listed in the first note in the customer's account! Below you will find a guide on where to find needed information. You can copy and paste a template from our reference sheet in OneDrive!
You will list the following information in a note titled "Sale Details"
- (OFFSET) (PAYMENT METHOD + LOAN DETAILS) ((Cost of System)) - found in SOLO on the proposal
- MOD TYPE ((PANEL COUNT)) - Found in SOLO on the proposal, verified on the contract
- System Size – 0.0KW - Found in SOLO on the proposal, verified on the contract
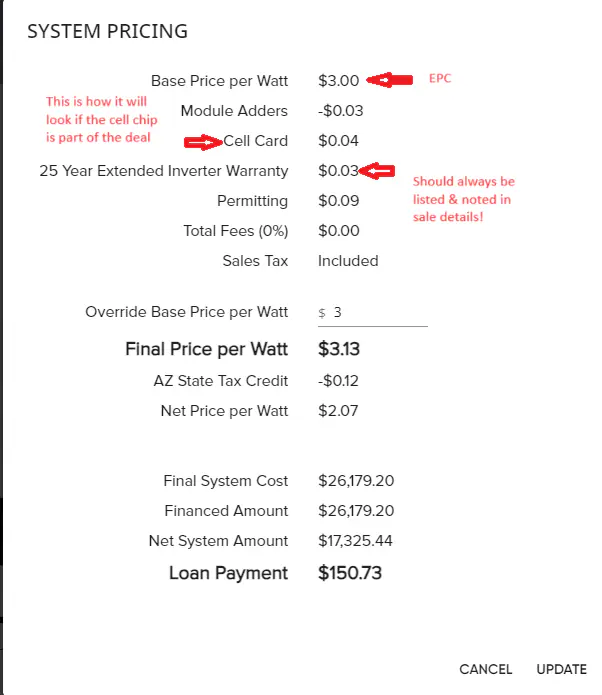
- 0.00 EPC - Found in SOLO, on the proposal, in the "Pricing" tab, noted at the top as "Base Price Per Watt"
- Dealer Fee 0% - Found in SOLO, on the proposal, in the "Pricing" tab
- Cell Chip - Found in SOLO, on the proposal, in the "Pricing" tab WHEN APPLICABLE, THIS WILL NOT ALWAYS A PART OF THE DEAL
- 25y inv. Warranty - Found in SOLO, on the proposal, in the "Pricing" tab THIS SHOULD ALWAYS BE LISTED/ A PART OF THE DEAL
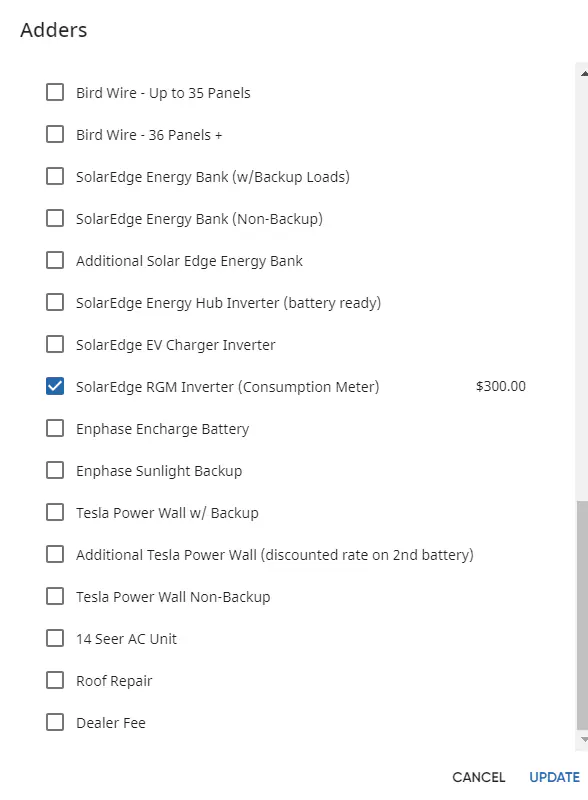
- ADDITIONAL ADDERS - Found in SOLO, on the proposal, in the "Adders" tab
- AHJ - found by searching the address in the county assessors site, or using the AHJ Registry
When the deal is a LEASE deal, this information will be a bit different & found in different places:
- (OFFSET) - Sunnova Lease Agreement OR Proposal for LR (PAYMENT METHOD) - Payment method will be "25yr (%) Sunnova/LightReach Lease", You will know this is applicable if the BHE contract is a lease contract & you receive a lease agreement
- MOD TYPE ((PANEL COUNT)) - Found on the contract/Proposal
- System Size – 0.0KW - Found on the contract/Proposal
- 0.00 EPC - on lease deals this will be left blank
- Cell Chip - Found in SOLO, on the proposal, in the "Pricing" tab WHEN APPLICABLE, THIS WILL NOT ALWAYS A PART OF THE DEAL
- 25y inv. Warranty - Found in SOLO, on the proposal, in the "Pricing" tab THIS SHOULD ALWAYS BE LISTED/ A PART OF THE DEAL
- ADDITIONAL ADDERS - Found in SOLO, on the proposal, in the "Adders" tab
- AHJ
Tag @AlexisCarrasco
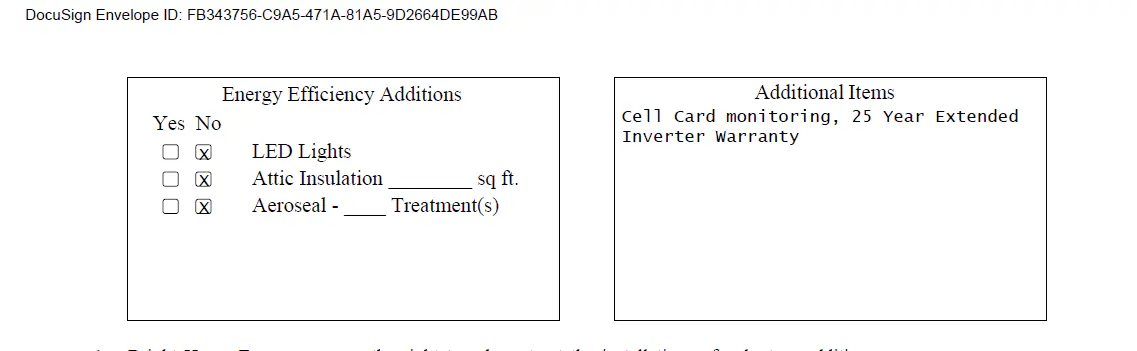
Lastly, you will want to check that there are no adders/efficiency items listed on the contract and not priced in through SOLO, this will be found on the top of the second page of the contract
Opening the Proposal through SOLO
To open the proposal you will:
Hover your mouse over the Sun icon the the left hand side of the SOLO web page
Click "Solar"
This will open a new screen, where you will click "View"
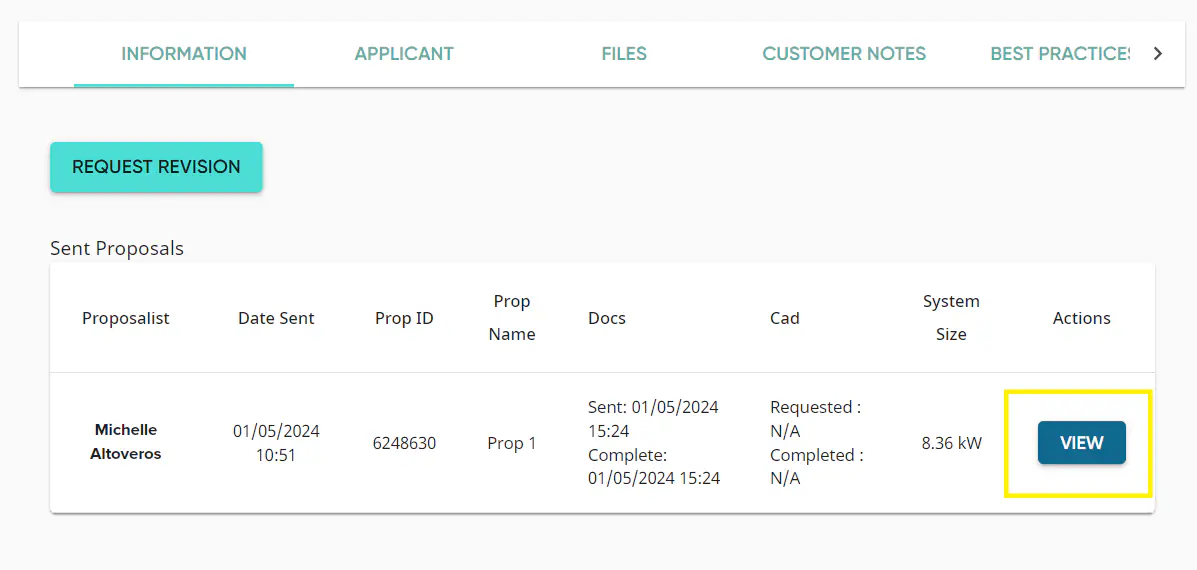
This opens the proposal in a new browser tab.

Once the proposal has been opened, you will want to download it as is so that we have the Original copy for reference of what was sold! To do this, you will click the 3 lines in the top right hand corner of the Proposal

This will open a list of options, from which you will select "Export to PDF"
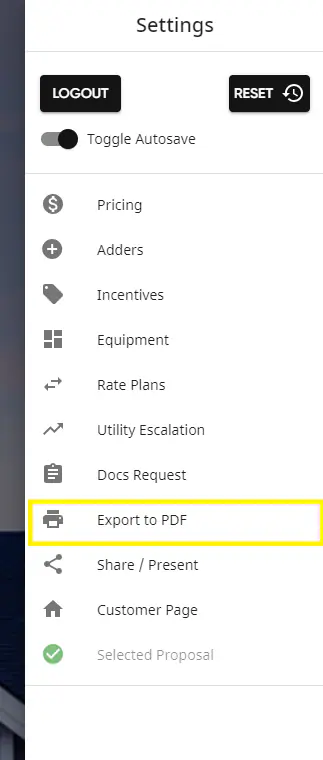
Export will begin in the background—continue to the next steps while it downloads.
Finding the Pricing & Adders Tab
Once the proposal is open, you will see three lines in the top right hand corner of the screen
Click that, and it will open a list for you, at the very top you will find both the pricing and the adders tab!
Info found in the pricing tab!
In the adders tab, you will know something needs to be listed if there is a blue check mark next to it! Be sure to also list the pricing in parenthesis beside it!
Contract Adders
There are times there may be adders/ efficiency items listed on the contract but not selected in SOLO - this means that the pricing does not reflect the adder being a part of the deal.
If this is the case, the adder will need to be listed in the Sale Details, and noted that it is listed on the contract, but not priced in
EX: Cell Card Monitoring is listed on the contract but not priced in
This line item will be noted at the bottom of the Sale details note
Sale Details Note : Final
Now that you have all the tools, resources & information, it is time to complete your note in the CRM!
Here is how the final note should look:
Cash/Loan
Sunnova/Lease
New Deal Note
The next step before converting the lead into a deal is to verify usage/ offset & make the New Deal note
This should read as follows:
Uploaded sale details, customer files, & (notate if & how you verified usage, any offset changes)
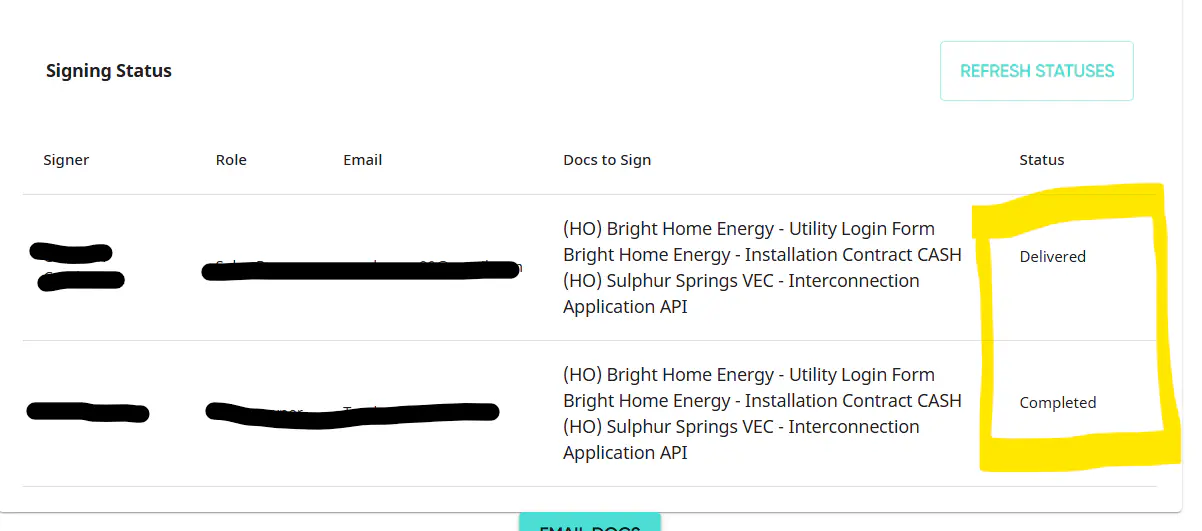
Converted to Deal
Signed in (Person/Email)
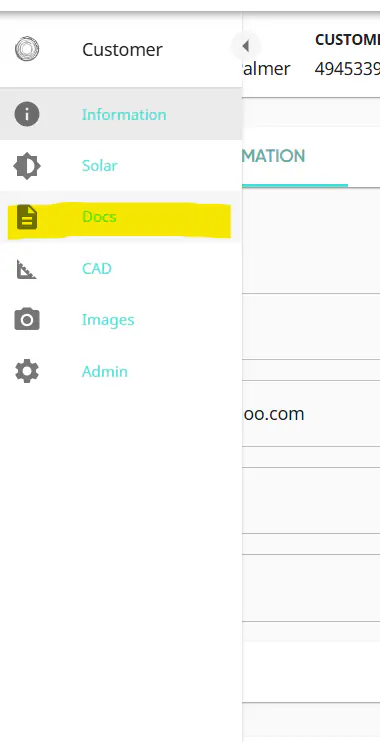
You will be able to determine where the signature occurred in the Docs tab in SOLO:
Signed in Person :
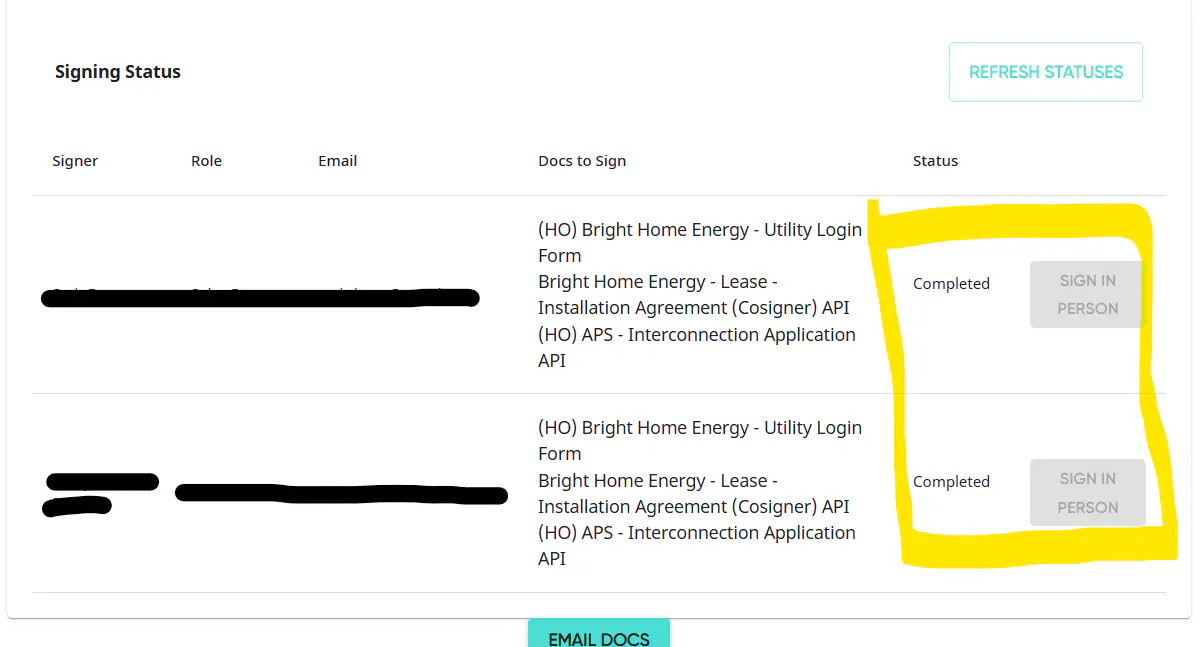
Signed in Email :
Once usage has been verified, along with noting offset changes, the updated proposal will need to be downloaded to be saved later on!
How to Verify Usage
Verifying usage will look a few different ways
Number 1 - the Sales rep has provided the utility login at the point of sale
In order to verify usage with the login, you will google "(Utility Name) Login"
Once you are routed to the online portal, use the information provided to login to the Customers account
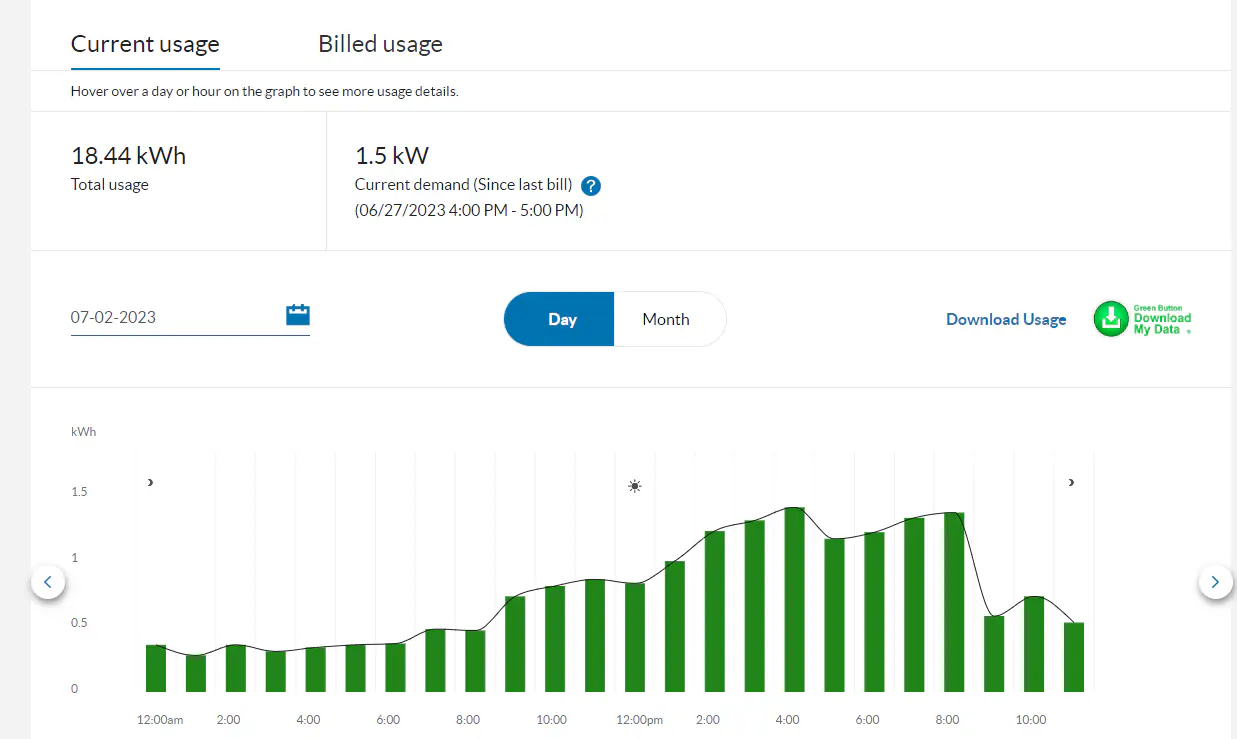
Depending on the utility provider, you will either be able to pull up an excel spreadsheet or a bar graph with the past usage information
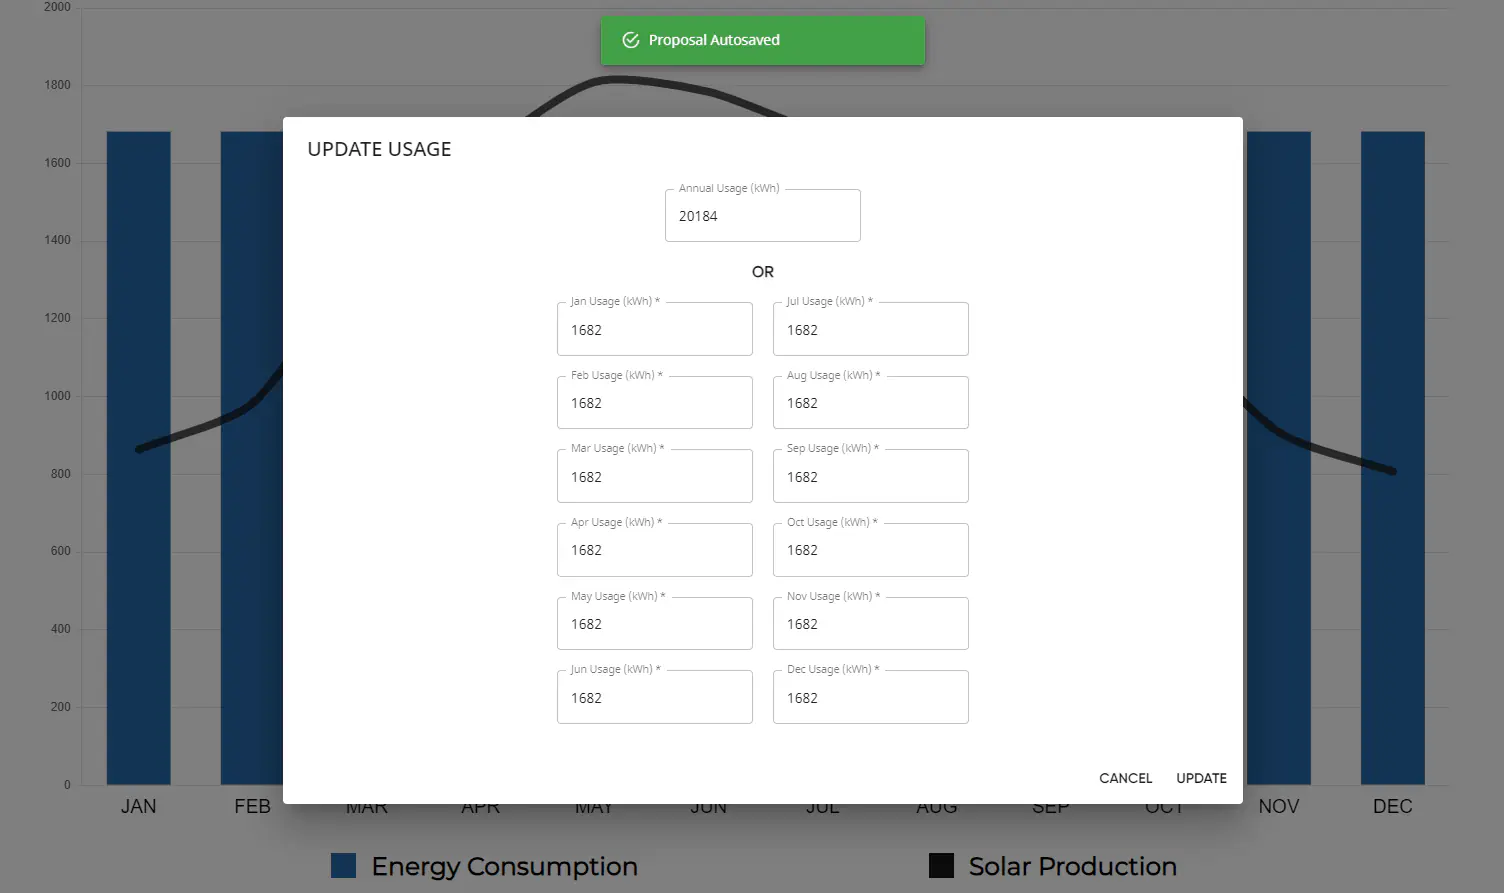
If there are 12 months available, you will simply add up the usage and input the information into SOLO to see how it affects the offset
If there are less than 12 months, you will input the data that is given into Aurora, Aurora will calculate an estimated yearly usage based off of what is provided. You will then input that number into SOLO to see how it affects the offset
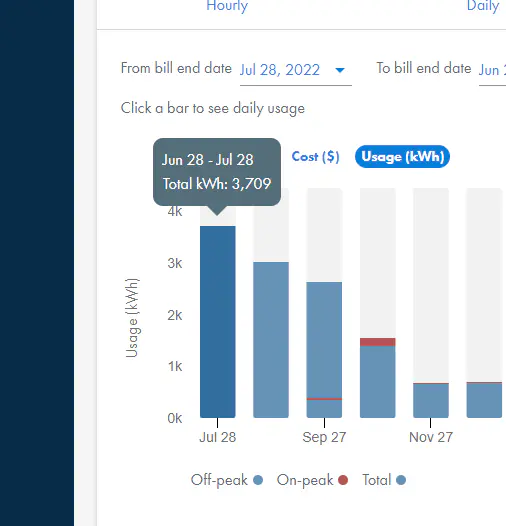
Number 2 - the Sales rep has provided a copy of the utility bill containing a bar graph of past usage
This way is a bit less accurate, but will still be a good tool to judge if the offset is in the right range
The bar graph shows average daily usage, so once you determine where the month falls, you will need to multiply the number by the number of days in the month
Once monthly usage has been determined for every month, you will add them all up and input the number into SOLO
Again, if there are less than 12 months, you will take the monthly usage and input into Aurora prior to being able to input usage into SOLO
Pulling Usage in APS
The first step in pulling usage through APS is logging in to the customers account!
To get to the login portal, enter "APS Login" to the browser search bar, the first link listed will direct you to the portal

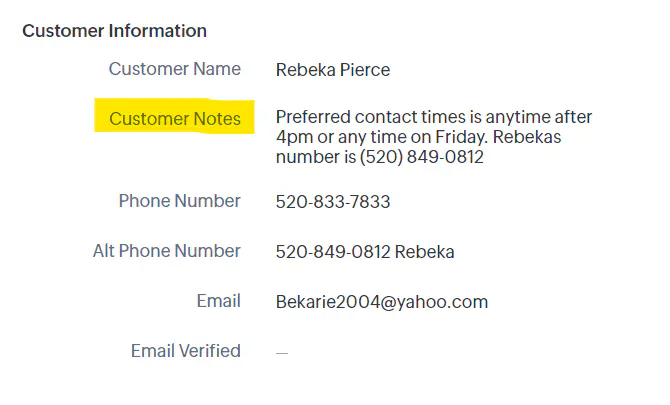
Here you will enter the login information that was provided on the Utility Login doc (sometimes, the login is also provided in the "Customer Notes" in SOLO
Once logged in, you will be directed to the customers main dashboard
Before pulling the usage, download the bill while you are already logged into the account, as this will save the team a step later in the process
To download the bill, you will click the "Bill"

Once the bill has loaded on the screen, click the down arrow next to "Download Bill"
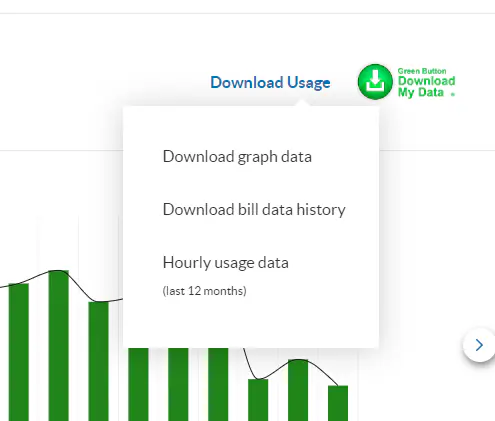
Once the bill is finished downloading, click the "Usage" tab at the top of the screen, it it right next to the "Bills" tab!
This will reroute you to a new screen, on which you will find a blue link that says "Download Usage"
Once you click on it, you will be given a drop down with 3 options, select "Download Bill Data History"
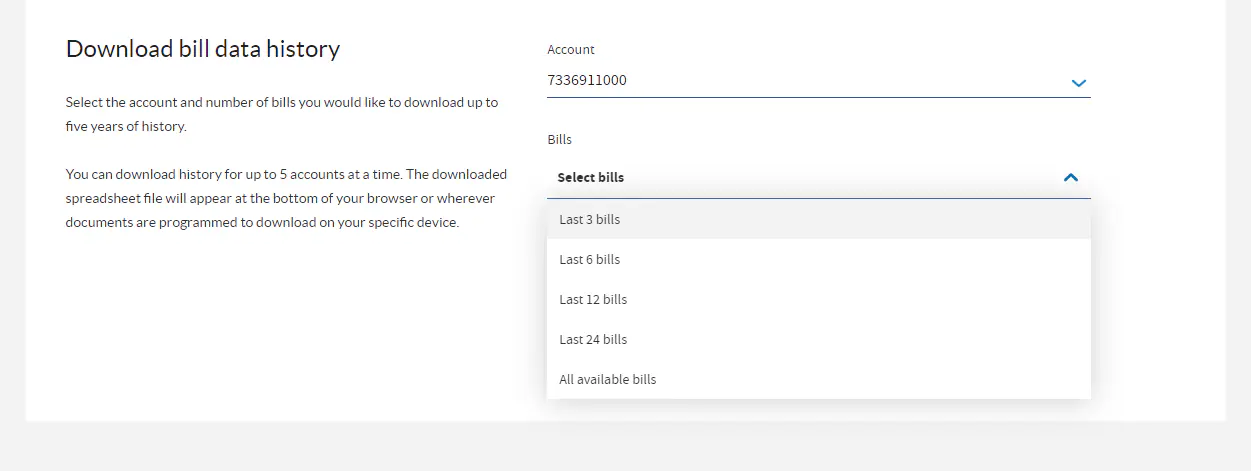
This will once again reroute you to a new screen - this screen there will be two drop down menu options, start by clicking the "Account", ensure all accounts are selected
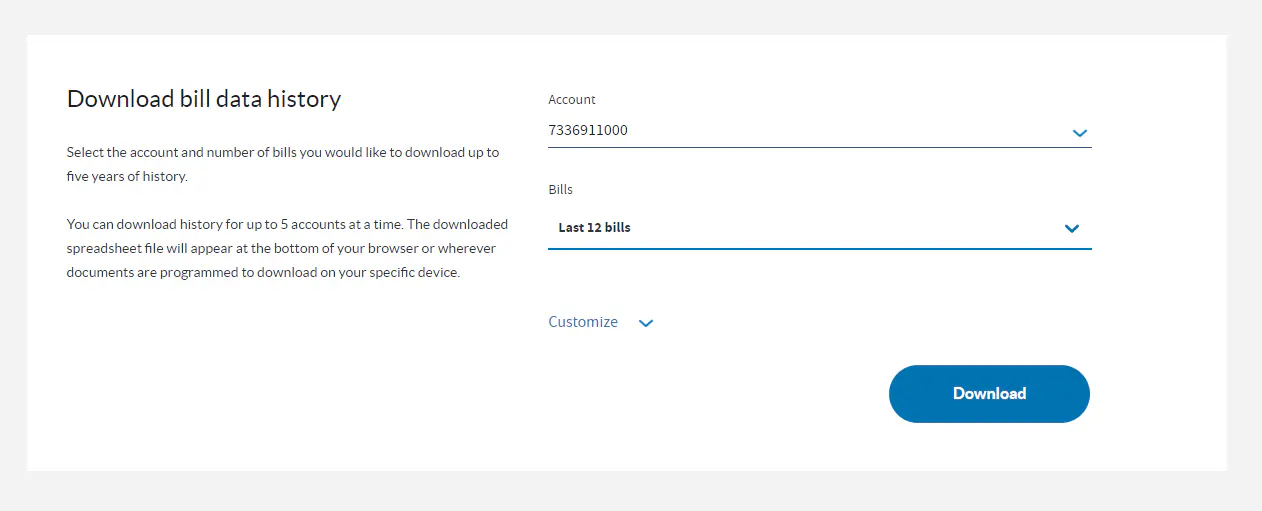
Then, select the "Bills" and Select "Last 12 Bills", if that is not an option, Select "All available bills"
Once these options have been selected, click the blue “Download” button
This will automatically download an excel spreadsheet

Once you click on it - you will get the following pop-up
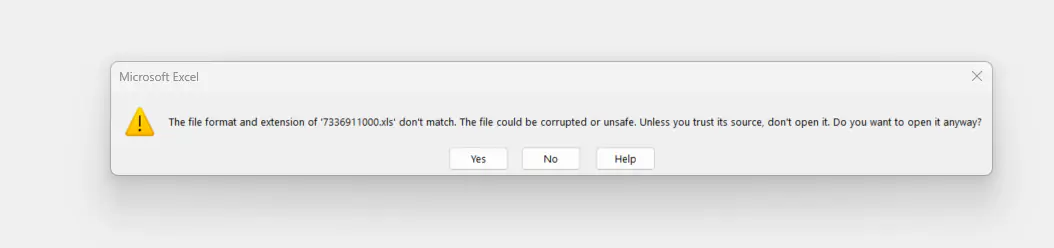
Select "Yes"
You will then want to expand column D to double check that the address of usage is the same address on the contract
Once that has been confirmed, hi-light column K, this will automatically provide the sum of the annual usage in the bottom right hand corner

The Sum is the number that you will input into the SOLO proposal in order to verify offset/usage!
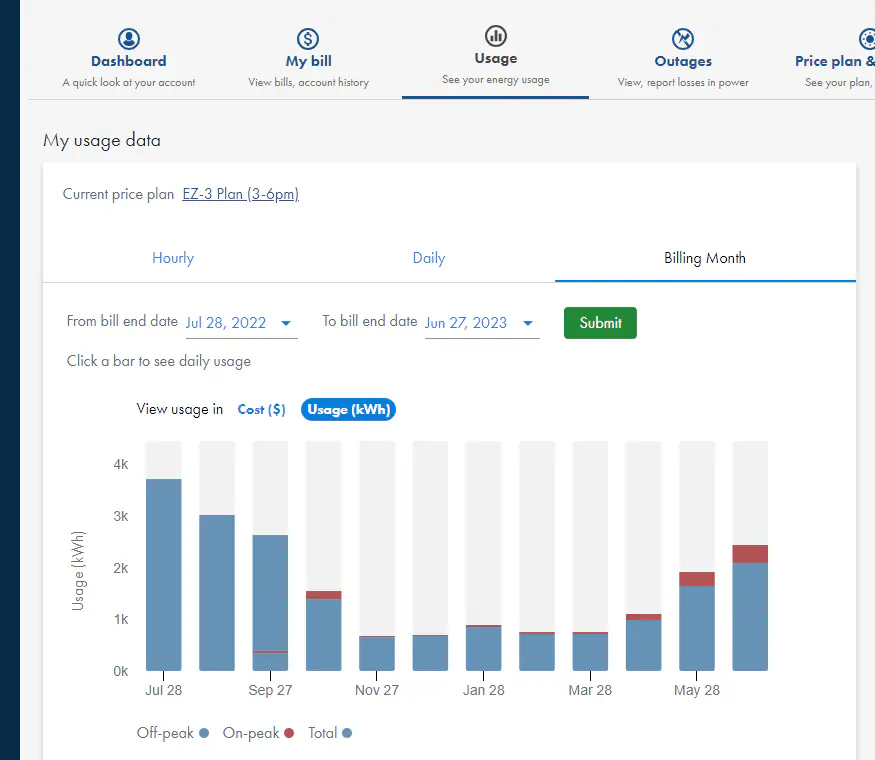
Pulling Usage in SRP
The first step in pulling usage through SRP is logging in to the customers account!
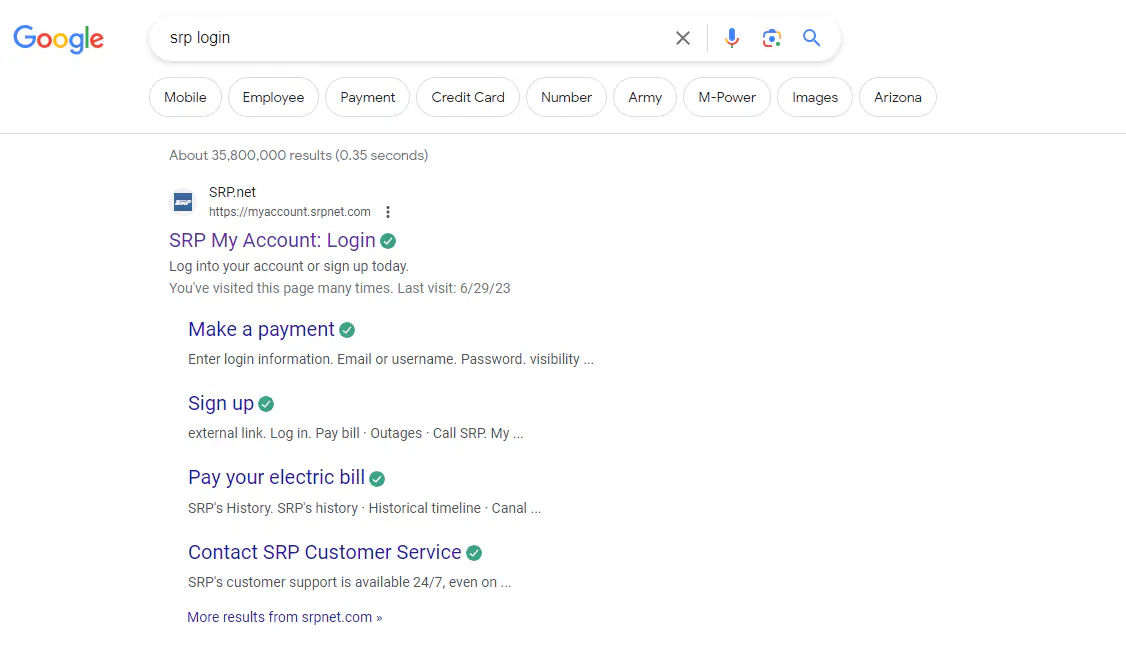
To get to the login portal, enter "SRP Login" to the browser search bar, the first link listed will direct you to the portal
Here you will enter the login information that was provided on the Utility Login doc (sometimes, the login is also provided in the "Customer Notes" in SOLO
Once logged in, you will be directed to the customers main dashboard, click the "Usage" tab at the top of the screen
Adjust the usage data to show KWH & Billing Month
Using the mouse to
SOLO Notes
Finally, you will notate any details of the sale left for you by the sales rep in the SOLO Notes
These will be found in the "Customer Notes" tab in SOLO
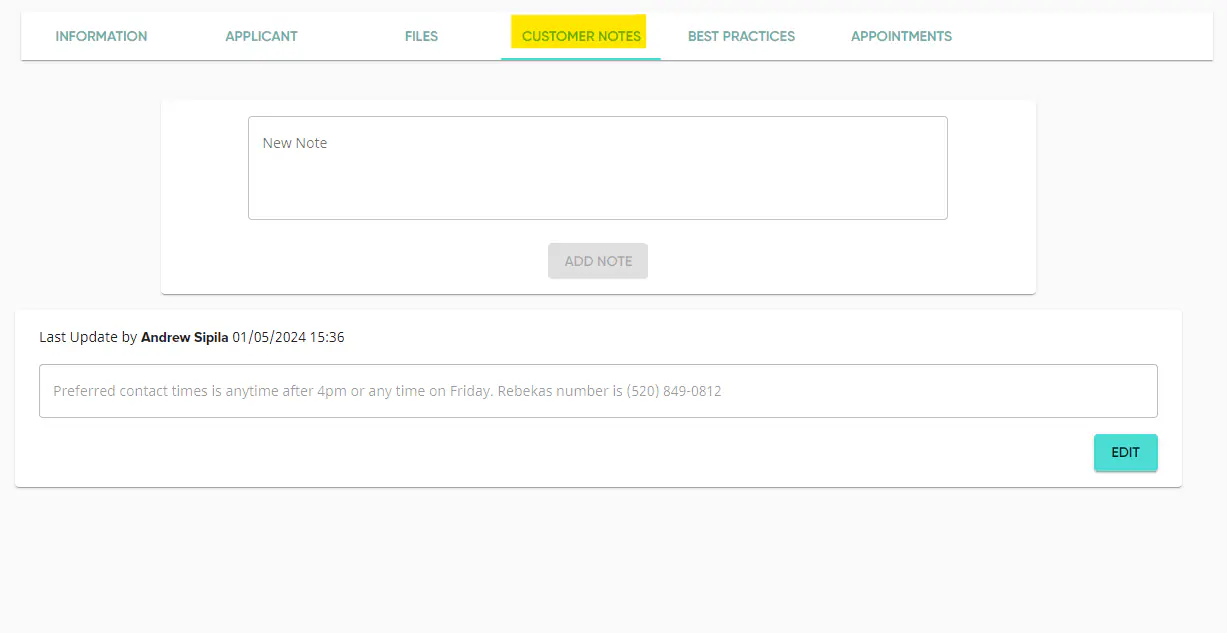
This note can be copy and pasted from the SOLO notes to the CRM
Final Look
Here is how your notes should look all put together:
Lead to Deal
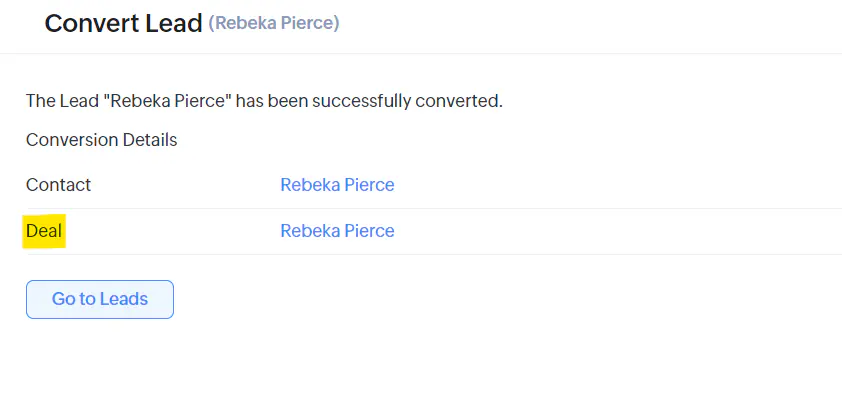
Finally, you are ready to create the deal, to do this you will go to the top right hand corner of the CRM and click "Convert"

This will route to a new screen, where you will select "Create a new Deal for this Contact."
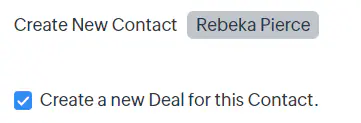
This will open a drop down of boxes to be filled in with the deal information!
Filling in the Deal Information
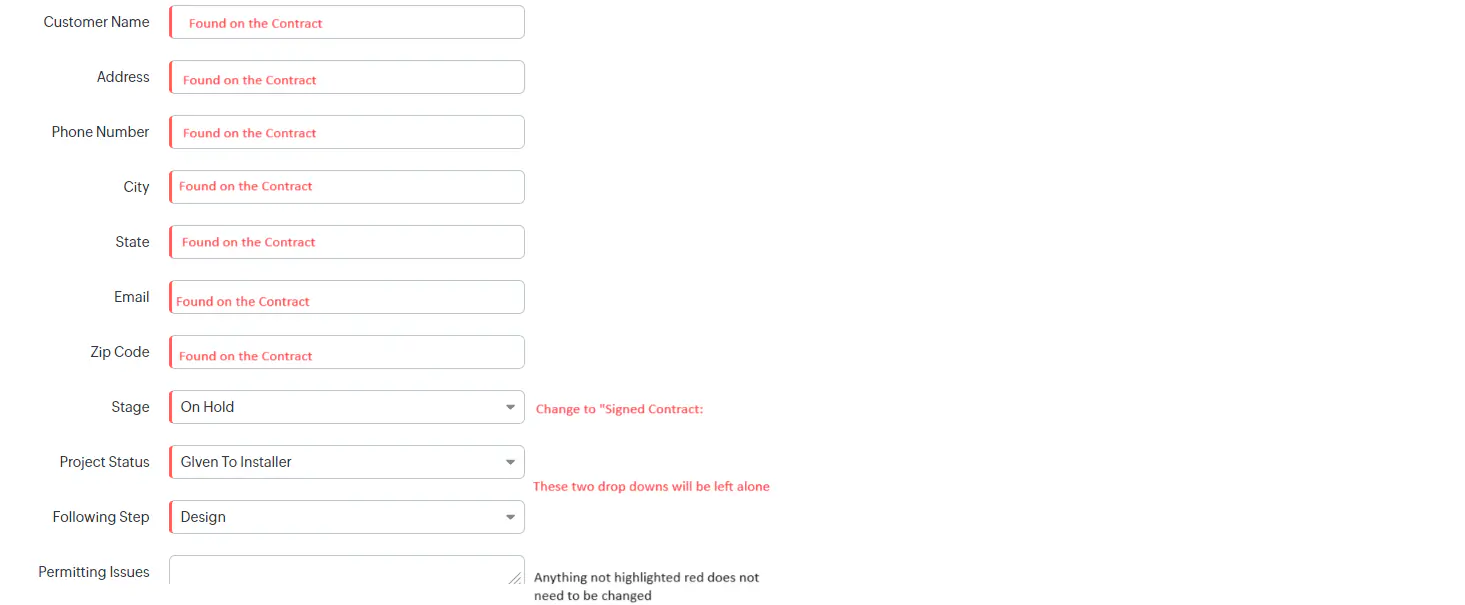
Once all of this information has been filled in, Click "Convert" at the bottom of the page
Finishing Touches
Once you are finished converting, head into the deal to complete the finishing touches!
Transfer any customer notes from SOLO into the Customer Notes in CRM
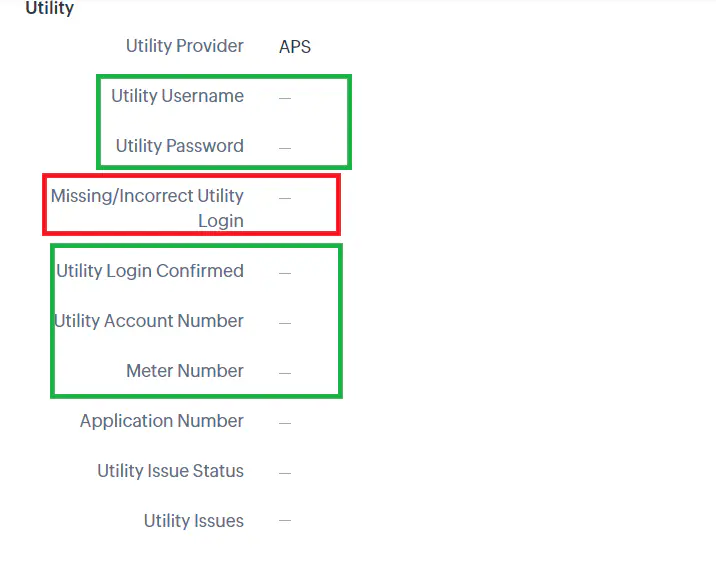
Update the APS information, mark as missing if it was not provided by the rep. Once information is obtained at intro call, update accordingly!
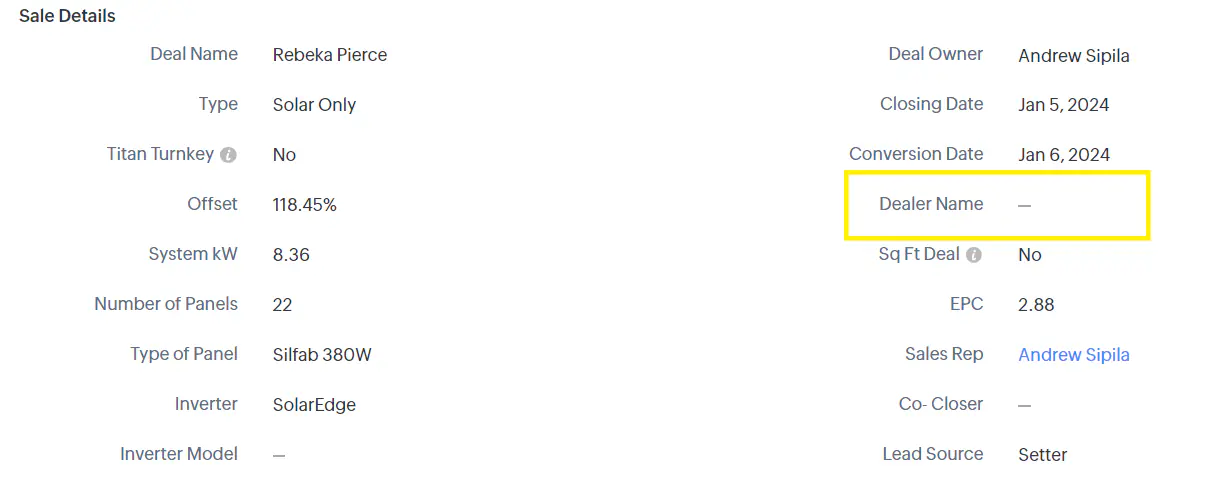
BEFORE UPDATING THE DEALER NAME - INPUT THE REP & SETTER PHONE NUMBER
-Michael Shepp does not need his phone number input
-BHE communities deals w/ Tyler listed as the setter does not need his phone number input
Update the applicable dealer name
Lastly, you will save all documents to the HO's one drive folder & Upload to CRM

Once completed, you are ready to move in to your Intro Call!
Naming Documents
When saving documents to the one drive folder, we need to ensure that the docs are named the same way across the board.
You will also want to Extract page 3 (graph) of the final proposal to save for the Final Packet
The documents should be named as follows:
| Install Agreement | Executed Contract - Smith |
| Acknowledgement and Understanding | BH Acknowledgement & Understanding - Smith |
| Consumer Acknowledgement | APS Consumer Acknowledgement - Smith |
| ResDisclaimer | APS Disclaimer - Smith |
| Sunnova-Lease- | Sunnova Lease Agreement - Smith |
| Utility Login | (HO Utility CO) Login - Smith ex : APS Login - Smith |
| SRP Utility Docs | SRP Utility Docs - Smith |
| Proposal (As Sold) | Proposal (Original) - Smith |
| Proposal (Edited) | Proposal (Final) - Smith |
| Pg. 3 of Proposal | Production Graph - Smith |
| Utility Bill | (Utility Name) Bill - Smith |
| Docusign Summary | Closing Docs Summary - Smith |
| LightReach Contract | LightReach Lease Agreement - Smith |